Tuesday, April 26, 2011

It's a Block Study


I painted a block study today because I needed it. You know, a good old dose of color. I find my feet dancing uncontrollably when I am painting a block study. It is fun. I had to correct my drawing in a few places. I had to resolve the changing background light as it became too similar to the yellow block shadow.
Good study.

Wednesday, April 20, 2011

Knitting Clock


Here is a great site that will show you an interesting clock. It is the knitting clock that knits a scarf in one year.

Tuesday, April 19, 2011

The Shell Game


Here is a completed study of a shell, apple and black flat vase. Fun but not easy. I was happy with the study because I learned how to simplify and see specific detail.
Oh - I have continued my portrait starts. They seem to be getting worse than better.
I can't wait for class, again, to continue.

Friday, April 15, 2011

You Got to Start Somewhere


I started my first 100 portraits. This was recommended by the portrait instructor I am just started with. I worked on two starts yesterday. A start it just toning the canvas, drawing the portrait, defining the dark areas, and blocking in the darkest dark, lights and background.
The dark and background areas you use a lot of turpenoid.
I did two portraits yesterday and made sure I made it to open studio with a live model today.
You have to start somewhere.

Thursday, April 14, 2011

Zorn Palette and Learning Portraits


I am learning how to paint portraits and figures in two classes as I move to more advanced studies. I decided after 4 weeks the figure painting I needs to take a portrait class, too. I need a refresher course with portraits. It hasn't been quite a year since I started studying still life. Basically, a portrait is a made up of all the parts of the five basic shapes. There are five, right?
I was told I would be using the Zorn palette which consist of the primaries. Black for my blue, cadmium red for my red and yellow ocher for my yellow. I, also, found out how to make yellow ocher with transparent red oxide and cadmium yellow or lemon yellow. It makes a nice ocher.
I am re-learning the ratio of a head. I have studied it in the past but have not continued practice as life's distractions took me in another direction. It happens. Bright shiny thing syndrome (BSTS)
Here is my study from last night. I am learning to block in the face. The background and shadow colors, you use a lot of turpenoid. Big brush strokes for the background. Also, wipe the brush after 3 strokes, dip and brush 1-2-3 and wipe. This will teach you not to "lick" the canvas with your brush. Sounds gross.
The instructor demoed the other stages and it was good. The tip I remember most is always start at your last brush stroke. Don't dab all around.
I like the measuring aspect of this instruction, too, regarding the face. It is a very logical approach.
I was told to paint 100 portraits. Sounds like I have get my planner out and schedule this in.

Tuesday, April 12, 2011

Plein Air in Brookings


This will be fun for those traveling artists on vacation. See the schedule here.

Fresh From the Freezer


This study is fresh from the freezer. It is where I keep my studies, in between classes, so they don't dry up.
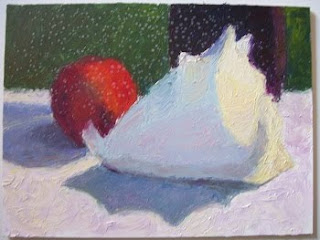
This particular study I had to put more white into the light side of the shell. You can see where I will have to turn the shell and make sure it is curved. The curving will show it is an organic shape.
Initially, when I set up the still life, the top spike of the shell was lined up to the edge of the vase. I didn't realize it until Susan, the instructor, pointed it out. A second opinion is always good. An experienced opinion.
The still life was then rearranged to change this.
It is important, also, not to make the composition with equal distance on each side of the objects. Do not center the focal point.
The difficult part of the initial painting was to ensure the shell shadow was not similar to the background color.
You might see where the tabletop is close to the value of the shell's light side. I need to be careful to see and compare.
When painting the apple, I made sure to find the darkest dark of the apple and compare it.
Then, you must compare the darkest dark of the whole painting. Compare, compare, compare.

Sunday, April 10, 2011

Day 2 - Plein Air Gutter Art


This was day 2 of the class I took with David Lobenberg. Still can't believe you can have this much fun outdoors with paper, water and color. Good class.
Here are the rest of my studies.
My cherub isn't a very good piece but it showed my initial complaint about why I was taking the class. Everything I have recently painted in watercolors was going gray and, even though I am keeping the white paper, the study looks... mushy. Yes- mushy. It was a good lesson and showed that I am trying to work too many values into a study that it suppose to be a 3 - 4 value study. I was overworking the piece with the water pen. My notes from Day 1 clearly state not to go back into the tombow ink until it dried. I couldn't wait so I messed up the face with my need to hurry the process.
Oh, and when we went outside to draw the Fair Oaks Coffee House and Deli, I spent over an hour drawing, o sitting on a curb with my feet in the gutter. Who would have guessed that art would put me in a gutter? I will call the piece "Gutter Art".
Oh and no pun intended, check out my cans.

I Struggle With Gray Areas


I learned how to use a tombow pen and a niji waterbrush for my class this weekend that taught you on the go wash. No soap and bathtub needed. This easy art project is done with a few inexpensive tools. A black tombow pen, a waterbrush to hold your water, a pencil, a sharpie ultra thin pen, eraser and 140 pound 9X12 watercolor paper tablet. BTW - it was fun.
David Lobenberg conducted the class with his legendary style. He always keeps the enthusiasm up - or maybe it was just me. I was so happy with this technique I chatted away and that it me caffeine free.
Here is the day 1 lesson examples. I learned that I still struggle with gray areas but I do like the tombow and adding water. We traced several drawing, created square boxes and practiced the tombow with a waterbrush. Then we went outdoors to continue.
The pictures below were drawn with pencil and then outlines with a Sharpie ultra fine pen. If you wanted, you could erase your pencil lines. I like to keep them in.

I was also reminded to not make straight lines straight. Break them up.
Notice all my notes around the drawings. I consider that part of the art.

Friday, April 8, 2011

Play Date with Artists


I had a play date with Audi Stanton last week. She showed me a how to have fun with coffee filters, cosmetic pads,paper clay, yarn and dyes. It was fun.
We, also, took our acrylics and made trees using the Robert Burridge method. Fun, fun, fun.

New Class This Weekend

I am taking a new class this weekend with David Lobenberg. It is On The Go Line and
Wash Sketching. I can't wait. All my supplies are sitting by the door.
Earlier, I took today to do a quick study of a portrait I did after waking up late. Yes - I slept in.
I then typed all my notes from my previous classes.

Wednesday, April 6, 2011

Completed Statue Study from 03/18/2011


Here is the completed statue study I am finally posting from last month. I was happy with the study.

Figure Painting is Hard - She Whined


Okay - figure painting is hard. It is so difficult that I forget everything I have ever learned. I swear I was drooling with a dumbfounded look on my face today. Not to mention, I had a piece of carrot stuck in my front tooth. I noticed it three hours later - after class and in my car as I was driving away.
Here is my study. Her left breast should not be that big but I forget all about perspective.
Oh and I kept moving her shoulder off the right side of the canvas because I kept making her head bigger and bigger. I started to lose my values I initially established.
The bright side. I am not going to quit.